I’ve Moved…

Please visit me at my new blog address: wippapercrafts.

Thanks, Erin.

Posted in Uncategorized | Leave a comment

Finding My Mojo – Mojo Monday 276

I haven’t worked with a Mojo Monday sketch in a long time.  Here is a copy of the current Mojo 276 sketch:

Mojo276Sketch

And here is my Mojo 276 card:

WIP Paper Crafts Mojo 276_watermark

This is my first attempt using the 3D Stamping Technique – the plant in the centre of the oval was stamped twice, once in Crumb Cake and then again in White Craft ink.  By offsetting the two images, it is supposed to give the illusion that it is a 3D image.  Next time I think that I would emboss the white image with white embossing powder to make it more solid.  Hopefully this would make the technique more effective.

I like the colour palette for the card, I’m just not sure what occasion I would use this card for.  Any suggestions?

Thanks for stopping by!

Stampin’ Up Supplies:

  • Stamps: Just Believe, En Francais
  • Paper: Baja Breeze, Riding Hood Red, Blushing Bride (retired), Whisper White, Twitterpated DSP
  • Ink: Baja Breeze, Riding Hood Red, Crumb Cake, White Craft
  • Accessories: Finishing Touches Edgelits Die, Riding Hood Red Pleated Satin Ribbon (retired), Beautiful Wings Embosslit

Erin.

Posted in 3D Stamping, Cards, Challenges, Mojo Monday, Technique | Tagged , , | Leave a comment

A Cool January Birthday Card

So much fun – a winter card that is not a Christmas card!  Perfect for a friend who lives in Northern Ontario!

Here is my card:

WIP PC Cool Jan Bday Card_watermark

I used one of my favourite embossing folders, Northern Flurry, on the background and couldn’t reist adding some rhinestones to the centres of the snowflakes.  My favourite element though is the cute polar bear from the Zoo Review stamp set.  I’m sure polar bears aren’t that cute if you were to meet one face to face but that’s how I like to think of them.  I used a blender pen to emphasize some of the shadows and to colour the ice below the bear’s feet.  I cut the image out using one of the smallest sized Window Frames framelits.  In order to highlight the stamped image, I sponged the edges and mounted it on top of a card stock square.

All in all, a simple card that allows the polar bear to shine!

Thanks for stopping by!

Stampin’ Up Supplies:

  • Stamps: Zoo Review
  • Paper: Pool Party, Chocolate Chip, Whisper White
  • Ink: Black Stazon, Pool Party, Sahara Sand
  • Accessories: Northern Flurry Textured Impressions EF, Blender Pen, Chocolate Chip Grosgrain Ribbon (retired), Rhinestones

Erin.

Posted in Birthday, Cards, Winter | Tagged , | 2 Comments

Madison Avenue Occasions Thank You

A quick post today.

I finally got to play with some of my goodies that arrived last week, including some new Spring Catalog and sale-a-bration items.  Lot’s of fun!

Here are my two latest cards:

WIP Paper Crafts - Madison Thank You 1_watermark

My fun find, the Petite Curly Label Punch in the 2013 sale-a-bration offerings coordinates with the sentiment label of two of the stamps in the It’s a Wrap Occasions stamp set.  I stamped the Thanks SO much stamp in both Primrose Petals and Gumball Green.  I punched out the sentiment from the Gumball Green image and placed it on top of the the sentiment in the Primrose Petals image.  And just like that, the image is duo coloured!  How cool is that!

Two other SAB peaks in these cards are the flowers which are from the Madison Avenue stamp set and the texture of the background panel is from the Vine Street Textured Impressesions EF.

Thanks for stopping by!

Stampin’ Up Supplies:

  • Stamps: Madison Avenue (SAB), It’s A Wrap Occasions
  • Paper: Gumball Green, Primrose Petals, Raspberry Ripple, Whisper White
  • Ink: Gumball Green, Primrose Petals, Summer Sunfruit
  • Accessories: Petite Curly Label Punch (SAB), Vine Street Textured Impressions EF, Raspberry Ripple Stitched Satin Ribbon, Rhinestones

Erin.

Posted in Cards, Thank You | Tagged , , , | 1 Comment

First Posted Card for 2013!

In an effort to kick start my creativity after a multitude of Christmas crafts, I found a new challenge website, Pals Paper Arts.  They post two challenges each month, one is a colour challenge and the other one is a sketch challenge.  The challenge (PPA150) this time is a colour challenge:

PPA Colour Challenge 150

The idea of a colour challenge appeals to me – they will hopefully inspire me to use colours and colour combinations that I wouldn’t normally.  For instance, I don’t reach for Melon Mambo very often as I find it to be a very bright pink but it works very well in combination with the two neutral colours.

I was inspired by one of Gail’s (Mamaxsix) cards on Splitcoaststampers which can be seen here.  I added it to my favourites with the notion to recreate it at a later date.  This challenge was the perfect time.  I swapped out the circles in Gail’s card for hearts – perfect for Valentine’s Day – and changed up the sentiment.  Here is my recreation:

WIP Paper Crafts_Inlaid Heart Valentine_blog

I love the inlaid embossing technique.  I used it on a few of my Christmas cards and love the look on this card – it’s the element that drew me to Gail’s card in the first place.

Thanks for stopping by!

Stampin’ Up Supplies:

  • Stamps: Teeny Tiny Wishes
  • Paper: Melon Mambo, Basic Gray, Basic Black
  • Ink: Melon Mambo
  • Accessories: Heart to Heart Punch (retired), Square Lattice Textured Impressions EF, sponge

Erin.

Posted in Challenges, Pals Paper Arts | Tagged , , | 3 Comments

Getting Back On A Regular Schedule

Hello!

Well, the craziness of the holiday season is finally over and I’m getting back on a regular schedule.  I have been missing in action for quite awhile.  I still have a few holiday cards left to post but I think that I’ll leave them for now – I’ve grown weary of Christmas crafts.

I haven’t been working too much on card making over the holidays, I’ve been focusing on organizing my craft space.  I’m almost done and will post some pictures once it is complete. I do have a related project to share.

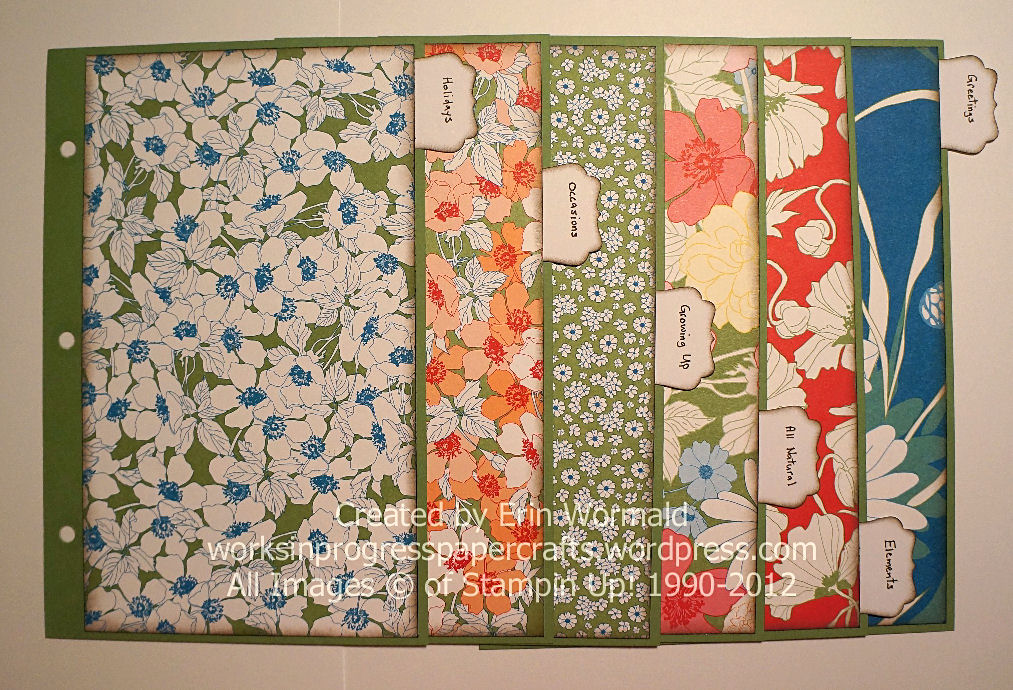
I have been meaning to make a stamp inventory for a long time now – an effort to keep track of the stamps that I have and to be able to find an image/sentiment quickly while creating.  Most importantly, to help me be more selective when buying new stamp sets.

I found a mini binder at an office supply store that seemed to be a good size – it holds 5 1/2″ x 8 1/2″ pages.  I created insets for the front and spine to dress it up a little – the paper I used is the retired Beyond the Garden DSP.  I created matching dividers using coordinating card stock and the DSP.   For the actual inventory pages, I chose to use the same categories as in the Stampin’ Up!  catalogs.  I created templates for 1, 2, 3 or 4 stamp sets per page to accommodate different sized stamp sets.  For each set, there is a location to record the stamp set name, stamp type (wooden or clear), the number of stamps in the set, the category and finally, the retirement status.

Here is my new Stamp Inventory binder:

WIP Paper Crafts_Stamp Inventory_binder 2 watermark

Here are the dividers:

WIP_Stamp Inventory_dividers watermark

And an example of the inventory pages:

WIP_Stamp Inventory_pages watermark

And here is my stamp inventory sitting on the shelf ready to use:

WIP_Stamp Inventory_on shelf watermark

I still have a lot more stamp sets to add to my stamp inventory but at least it is a start.  Hopefully I won’t have to expand to a second binder – at least not for my Stampin’ Up! stamps.

Finally, I don’t normally do the whole resolution setting thing but seeing as it’s a new year, I thought that I’d at least set some craft goals for the year.  So, here they are, my Craft Goals for 2013:

  • Make cards for birthdays, weddings, occasions, etc. and send them on time. I’ve improved on the first part of this goal but still need to work on the sending out on time part.
  • Create a stash of cards so that I’m ready for unexpected occasions.
  • Make a set number of Christmas cards each month so that I’m not in a rush come Nov. / Dec.
  • Complete our wedding and honeymoon scrapbooks – our second anniversary is in March so it would be good to finish these!
  • Spend more time learning My Digital Studio.
  • Create projects and hybrid cards using My Digital Studio.
  • Blog 2-4 times a week.

Hopefully by “writing them down” I’ll be more inclined to complete them by the end of the year.

Thanks for stopping by!

Stampin’ Up Supplies:

  • Stamps: none
  • Paper: Wild Wasabi, Early Espresso, Beyond the Garden Designer Series Paper
  • Ink: Early Espresso (for edge distressing)
  • Accessories: Decorative Label and Small Heart punches

Erin.

Posted in Organization, Stamps | Leave a comment

Quick Christmas Cards with Some Wow!

Since I was behind on Christmas cards this year, I was looking for easy, but not boring, Christmas card ideas.  I saw these cards that Beth created using the Snow Festival DSP and was inspired.

This pack of designer paper has a lot of variety in it with lots of great patterns and a colour palette that I’ve really come to love using for Christmas cards.  This made it very easy to select a pattern and use it as the focal point of a card.  Here are two of the cards that I created:

WIP Paper Crafts Snow Festival DSP Cards_blog

For the house card, I kept the design very much the same as the card Beth made.  The only changes I made were to the designer paper layer which I sponged the edges of and embossed.  This gave the designer paper layer a little something extra.  Since I was embossing this layer, I used a strip of card stock as an embedded layer rather than using ribbon.  I really like how the Petals-a-Plenty pattern somehow made the card more cozy – kind of like a quilt.

Since the designer paper is thin, I used no tabs on the Big Shot platform and included a piece of light weight printer paper in the embossing folder with the designer paper.  This seemed to minimize the amount and the degree of cracking of the designer paper.  There was still some though so using a sponge dauber, I sponged Illuminate Glimmer Watermark ink all over the front of the designer paper while avoiding the cherry cobbler strip.  This helped to seal the cracks and gave the patterned paper a fabulous shimmer – just enough to add some wow but not too much that it overpowered the card.  I tried to photograph it but it was impossible to capture the subtle shimmer in a photograph.

The mitten card is a little different than the house card but still a similar design.  I selected the Nordic pattern for this card and used the Make a Mitten stamp set and coordinating punch.  The designer paper was sponged and then embossed using the the Perfect Polka Dots Textured Impressions EF.  This pattern is less complex and didn’t seem to crack the paper very much.  But I loved how the sponged Illuminate ink looked on the first card so I used it on this card too.  The mittens were stamped in coordinating ink and punched out – the pattern on the mittens matches the paper!  To highlight them, I placed them on a circle embossed with the same folder used on the designer paper layer and mounted this on a scallop circle.  A greeting from the Teeny Tiny Wishes stamp set punched out using the Word Window punch, layered on a Standard Label punched layer and embellished with some rhinestones finished the card.

There you have it, two cards that are very quick to create but still have some wow.  I will have some more to share – I ended up sending them out before photographing them but will be creating more to have on hand.

Thanks for stopping by!

Stampin’ Up Supplies:

  • Stamps: More Merry Messages, Teeny Tiny Wishes, Make a Mitten
  • Paper: Baja Breeze, Cherry Cobbler, Gumball Green, Primrose Petals, Snow Festival Designer Series Paper
  • Ink: Soft Suede, Cherry Cobbler, Primrose Petals
  • Accessories: Petals-a-Plenty & Perfect Polka Dots Textured Impressions Embossing Folders, Punches: Word Window, Standard Label, Large Oval, Scallop Oval and the Mitten builder punch, rhinestones

Erin.

Posted in Cards, Christmas | Tagged , , , | 2 Comments

Snow Festival Designer Printed Tags to the Rescue!

Being under the weather for over two weeks really put me behind on making my Christmas cards.  While perusing Splitcoast and the web, I noticed lots of cards that incorporated Stampin’ Up’s Snow Festival Designer Printed Tags.  The cards ranged from the very simple to some that were very fancy and elaborate.  I had a couple of packages of the tags since I couldn’t resist ordering them – the price seemed too good to be true for the quantity of tags that you receive   Little did I know these would be my saving grace for making enough cards to send out this year.

The cards that I created are somewhere between the very simple and the more complex.  Textured Impressions Embossing Folders were definitely my friend!  They are a simple way to add a bit of wow to your cards.  All of the cards have an embossed card stock background with a tag as the focal point.  A few embellishments, punches and some ribbon was all it took to finish them off.

I created 10 card designs – 5 using the fronts of the tags and 5 using the backs of the tags.  Keeping the overall design of each card the same made it very easy to mass produce.  Here are the cards that use the fronts of the tags:

WIP Paper Crafts Snow Festival Tag Cards_front

and here are the cards that use the backs of the tags:

WIP Paper Crafts Snow Festival Tag Cards_back

Below are close-ups of the individual cards.

Front of Tag 1:

WIP Paper Crafts Snow Festival Tag Cards - Owl

Back of Tag 1:

WIP Paper Crafts Snow Festival Tag Cards - blue tag

Front of Tag 2:

WIP Paper Crafts Snow Festival Tag Card - Reindeer

Back of Tag 2:

WIP Paper Crafts Snow Festival Tag Card - green with peace

Front of Tag 3:

WIP Paper Crafts Snow Festival Tag Card - nordic heart

Back of Tag 3:

WIP Paper Crafts Snow Festival Tag Card - red tag

Front of Tag 4:

WIP Paper Crafts Snow Festival Tag Card - Cardinals

Back of Tag 4:

WIP Paper Crafts Snow Festival tag Card - Striped

Front of Tag 5:

WIP Paper Crafts Snow Festival Tag Card - ornaments

Back of Tag 5:

WIP Paper Crafts Snow Festival Tag Card - Blessings

And there you  have it, 10 Christmas card designs.  The only tag that stumped me was the one with the cardinals – it already has Merry Christmas on it so I struggled to figure out how to fill the white space.  Other than this card, the sentiment on the cards using the fronts of the tags was dictated by the spacing that was available.  There was more freedom when creating the cards using the backs of the tags.  My initial source of inspriation came from here.

Thanks for stopping by!

Stampin’ Up Supplies:

  • Stamps: More Merry Messages, Greetings of the Season, Curly Cute
  • Paper: Soft Suede, Baja Breeze, Cherry Cobbler, Gumball Green, Primrose Petals
  • Ink: Soft Suede, Cherry Cobbler, Gumball Green
  • Accessories: Snow Festival Designer Printed Tags, various coordinating ribbon, various Textured Impressions EFs, various punches, Rhinestones, Pearls

Erin.

Posted in Cards, Christmas | Tagged , , , | Leave a comment

November Sketch Card – Snowflake Soiree

First an apology for disappearing.  The bug that I got was horrible and seemed to be never ending – just as I was starting to feel well, I’d go downhill again.  Thanks to a new puffer and some antibiotics, I’m finally on the mend.  Thank goodness, there’s too much to do this time of year to be down and out!

I belong to a stamp club that meets once a month.  For some inspiration, you can choose to take part in a sketch swap – each month a new sketch is provided and each person who takes a sketch commits to making a card for all of the other group members who are participating.  I missed the Nov. meeting because I was away at my friend’s wedding and did not want to publish my card until I had the opportunity to hand out my cards at this month’s meeting.

Here is my Nov. sketch card:

WIP Paper Crafts Triple Stamp Soiree_blog

The sketch lent itself to the triple time stamping technique so I couldn’t resist.  I used Snowflake Soiree for the base and Mixed Medley for the sentiment.  A little baker’s twine and some snowflakes using the smallest snowflake from the Snow Flurry Bigz die in Pool Party and Island Indigo to finish off the card.

Lastly, I’m very excited to say that my Quilted Heart Card was a weekly favorite on Splitcoast Stampers.  It was such an honor to be mentioned among so many talented people!

Thanks for stopping by!

Stampin’ Up Supplies:

  • Stamps: Snowflake Soiree, Mixed Medley
  • Paper: Island Indigo, Whisper White
  • Ink: Island Indigo, Pool Party
  • Accessories: Snow Flurry Bigz Die, Island Indigo Bakers Twine

Erin.

Posted in Cards, Christmas, Stamp Club Sketch | Tagged , , | Leave a comment

Interrupting The Posting of Christmas Cards …

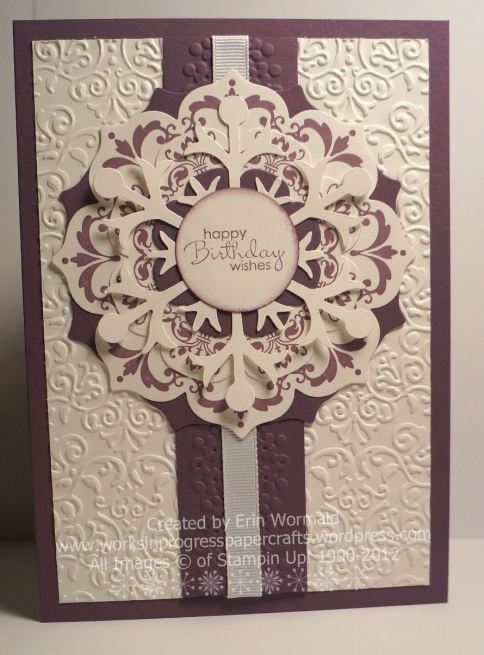
to bring you a birthday card.

Taking a break from the Christmas card craziness to post a birthday card.  I few weeks ago I shared a card (see here) that I created for a friend who was getting married .  Her birthday is next week so I changed gears for a little bit and worked on creating a birthday card to send to her.

I kept with the theme of the wedding card an created a “birthday medallion” using the Daydream Medallions set.  While we were in Winnipeg for the wedding, over 20 cm of snow fell during the course of the weekend so I wanted to incorporate “snow” into the card some how.  First, I added some snowflakes to the medallion using the Snow Flurry die.  Then I embossed a purple strip of card stock using the Delicate Designs Textured Impressions EF that looks a little like a row of snowflakes to add behind the medallion.

Here’s the final product:

WIP Paper Crafts Medallions Birthday_blog

Thanks for stopping by!  I’ll be posting another Christmas card soon.

Stampin’ Up Supplies:

  • Stamps: Daydream Medallions, Petite Pairs
  • Paper: Pefect Plum, Whisper White
  • Ink: Perfect Plum
  • Accessories: Snow Flurry Bigz Die, Floral Frames Framelits, Circle Punch, Delicate Designs Textured Impressions Embossing Folders

Erin.

Posted in Birthday, Cards | Tagged , , | Leave a comment